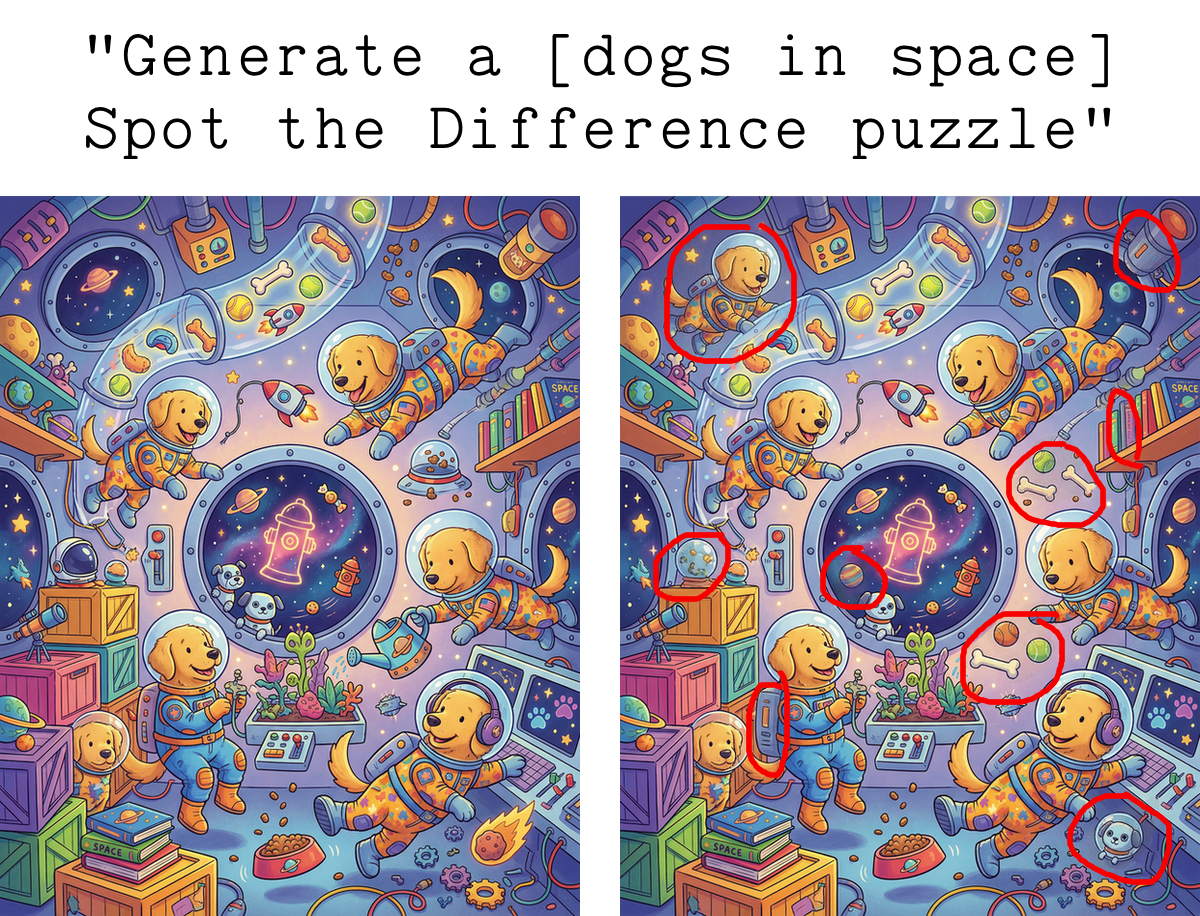
Next in my series of Children’s Activity Book Stuff That You’d Think Is Easy To Generate By Prompting AI But Turns Out Isn’t Quite So Simple: “Spot the Difference” images.
“Spot The Difference” was one of my daughter’s most-requested activities when building Elbo Books. Also my wife’s! The two of them love opening a book and solving these together.
(They love Hidden Pictures too, but that’s a whole different AI generation challenge we haven’t reliably cracked yet*).
Just like generating mazes, using AI to create Spot the Difference images sends you down one of two paths:
- Use a pipeline of clever prompts to coax top AI image generation models into producing something that looks pretty good at first glance, sometimes works, but is unreliable.
- Use a combination of custom code for forcing reliability/correctness + AI image generation for beauty/customization.
For our humble Elbo Books family business, we can’t be questioning whether the puzzles are reliable for kids every time. Path #2 it is!
I find the solution kinda fun so I’m sharing it.
The challenge with just prompting AI image generators
Generating the “original” / left-side image is trivial. Generating the “changed” / right-side image introduces three risks you’re trying to avoid:
the model changing too much stuff: you want N differences (“Find 5 differences…”) and you want those differences to not be absurdly obvious
the model not changing enough: you don’t want less than N differences, and each difference needs to be clearly visible to a human
the model making changes that look really weird
Each of these are bad, but #1 and #2 destroy the whole point of Spot the Difference.
It’s tricky to write pure prompts that reliably avoid these. Just naively asking Nano Banana Pro and its ilk to “make a small change that is hard to find but still visible to the eye, in the style of a Spot the Difference image” is a roll of the dice.
The closest I got to reliability with a pure-prompting pipeline was a sequence like:
- Generate original image
- Ask model to thoroughly describe in text everything that’s in the image with as much detail and spatial description as possible
- Ask model to select N things in the text description that it thinks would be good to ‘change’ (e.g. “change the red shirt on the dragon in the upper right of the image to a different color”)
- Take those suggestions and submit a sequence of new prompts to Nano Banana asking it to make X specific changes
This works ok sometimes! But it still doesn’t reliably rule out errors type 1 and 2 (so it won’t work for Elbo Books yet). And you’re really at the mercy of the detail/quality/spatial awareness of the image description and the granularity of objects/properties surfaced by the description.
You want to be able to change subtle properties like the color of just one hubcap on just one wheel of just one car, and this is particularly problematic due to the artistic complexity common in “Spot the Difference” images.
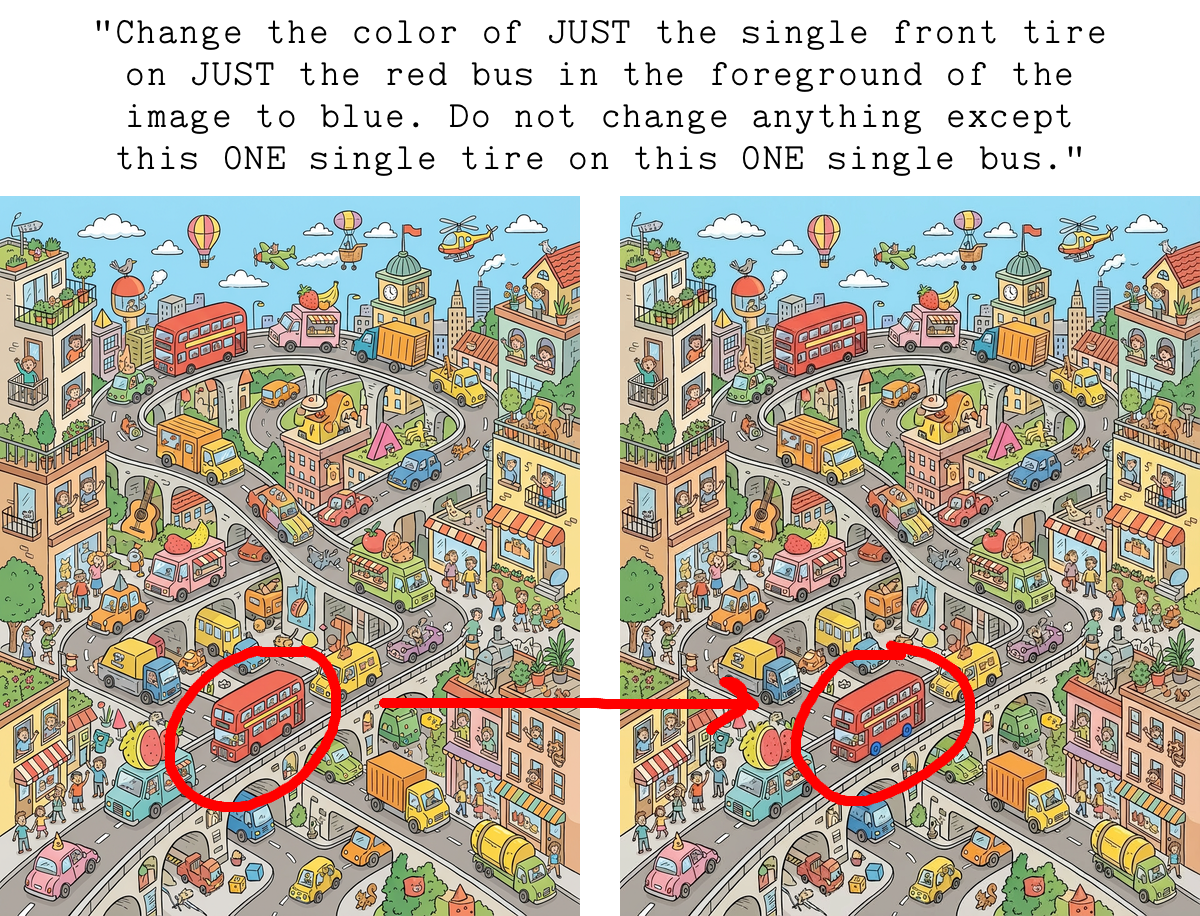
With an image intentionally packed full of complexity/many objects, you quickly start craving more control over the size and selection of which bits should be changed.
Our solution
Our solution combines segmentation, inpainting, and perceptual difference scoring to control the changes introduced.
1. Generate a fun, complex image about any theme
Trivial, despite the fact that just a few years ago I was yelling at my Dad trying to get him to freak out as much as I was about the fact that I could ask a computer to “draw a picture of a penguin” and DALL-E kinda worked.
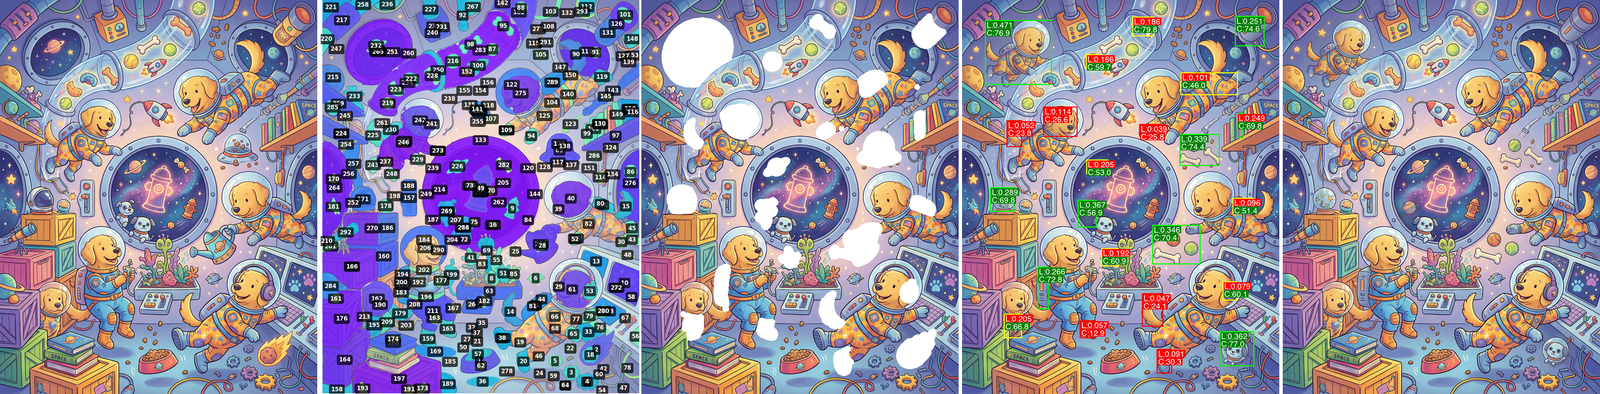
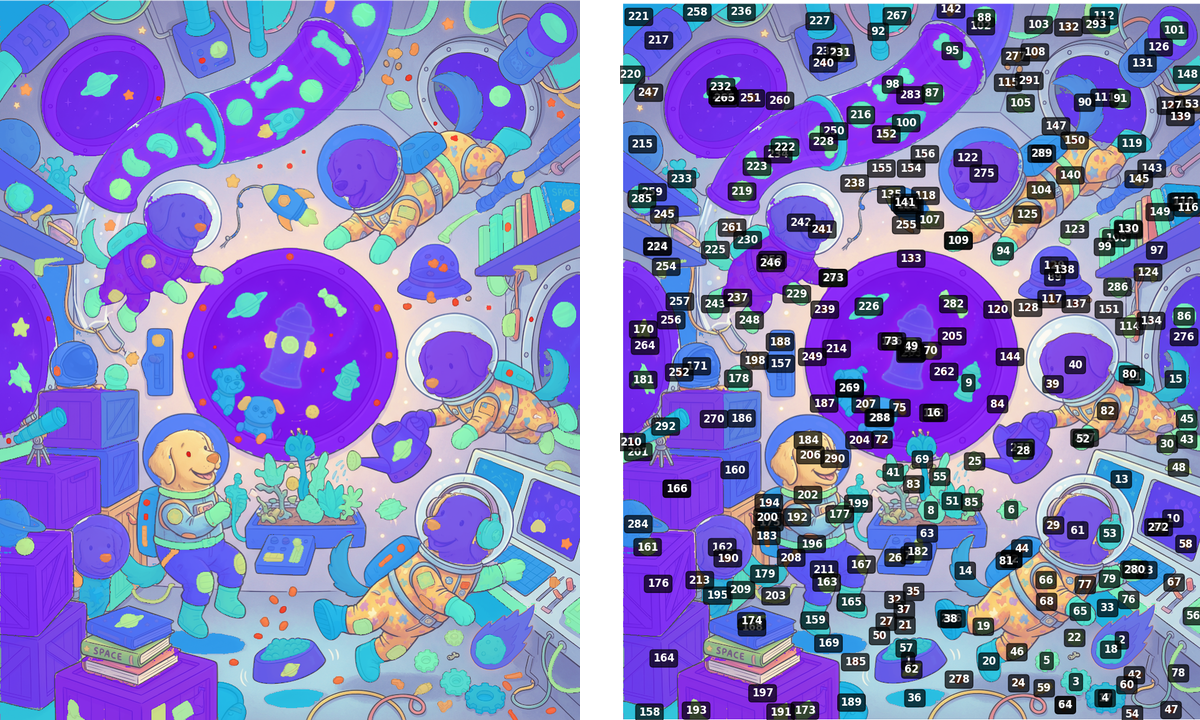
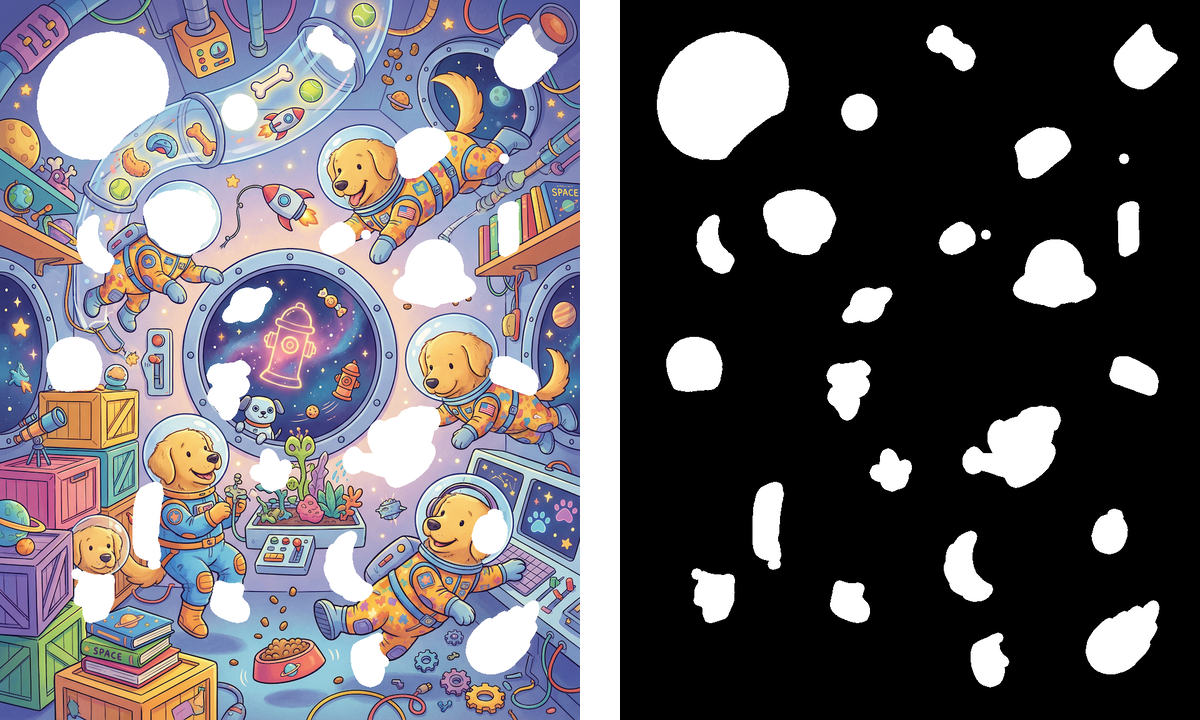
2. Use SAM2 to segment everything
SAM2 has an automatic mask generator mode that makes it segment everything in the image, returning all masks for all objects.
Getting this right for our use case involved a lot of SAM2 parameter tweaking. These params determine what gets identified as a segment (and dramatically change how long SAM runs). I wound up using their “base plus” model with the following:
return SAM2AutomaticMaskGenerator(
	sam2_model,
	points_per_side=32,
	pred_iou_thresh=0.88,
	stability_score_thresh=0.9,
	box_nms_thresh=0.5,
	crop_n_layers=1,
	crop_overlap_ratio=0.2,
)
This works quite well. Lots of candidate masks to work with.
3. Downselect to set of objects that are candidates for being changed
Next step is to pick a bunch of masks that map to objects we’d actually consider changing. We do this by:
- Filtering out masks that are too small or too big (using % area of total image)
- Filtering out masks that are too close to the edge of the image (we’re printing full-bleed onto paper and have to worry about margins / buffers for binding)
- Choosing a random subset of remaining masks
- While making sure they’re all at least X distance away from each other / not overlapping
Assuming we want N changes in the final image, we select up to 5*N candidate masks because more will be filtered out in coming steps.
4. Slightly grow/expand each selected mask before erasing
This makes room for more creativity in the changed version of each object.
5. Erase expanded masks, creating intermediary images before inpainting
Create a version of the original image with each candidate segment removed (to be inpainted) and a solid mask image (for inpainting models that use explicit masks).
6. Ask an image model to inpaint the masked areas
Use the above intermediaries with an inpainting-capable model to get a new reinterpretation of what belongs in each masked segment. You can get some fun results!
I use Flux.1 Fill and Nano Banana Pro for this. I started with Flux Fill because I like having explicit masking control, and I’ve spent more time testing it. But NB Pro does quite well despite lack of explicit masking functionality.
7. Assess each inpainted segment: did it change enough to be clearly visible to a human?
This is the trickiest part.
Inpainting masked objects can produce new versions of objects that look a lot like the old ones. We don’t want that, it would suck to tell a kid “Find 7 differences” but only 5 are visible to humans.
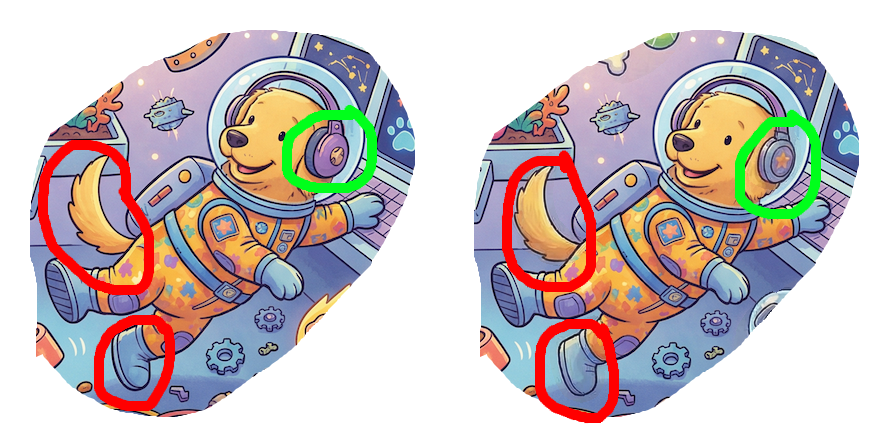
I’d label the dog’s headphones change as “hard to find but good”.
The tail and boot? Almost indistinguishable, despite the right being inpainted completely brand new (and remember, we expanded the erased masks to give more room for alternate inpainting results). Asking kids to find those differences is a recipe for misery.
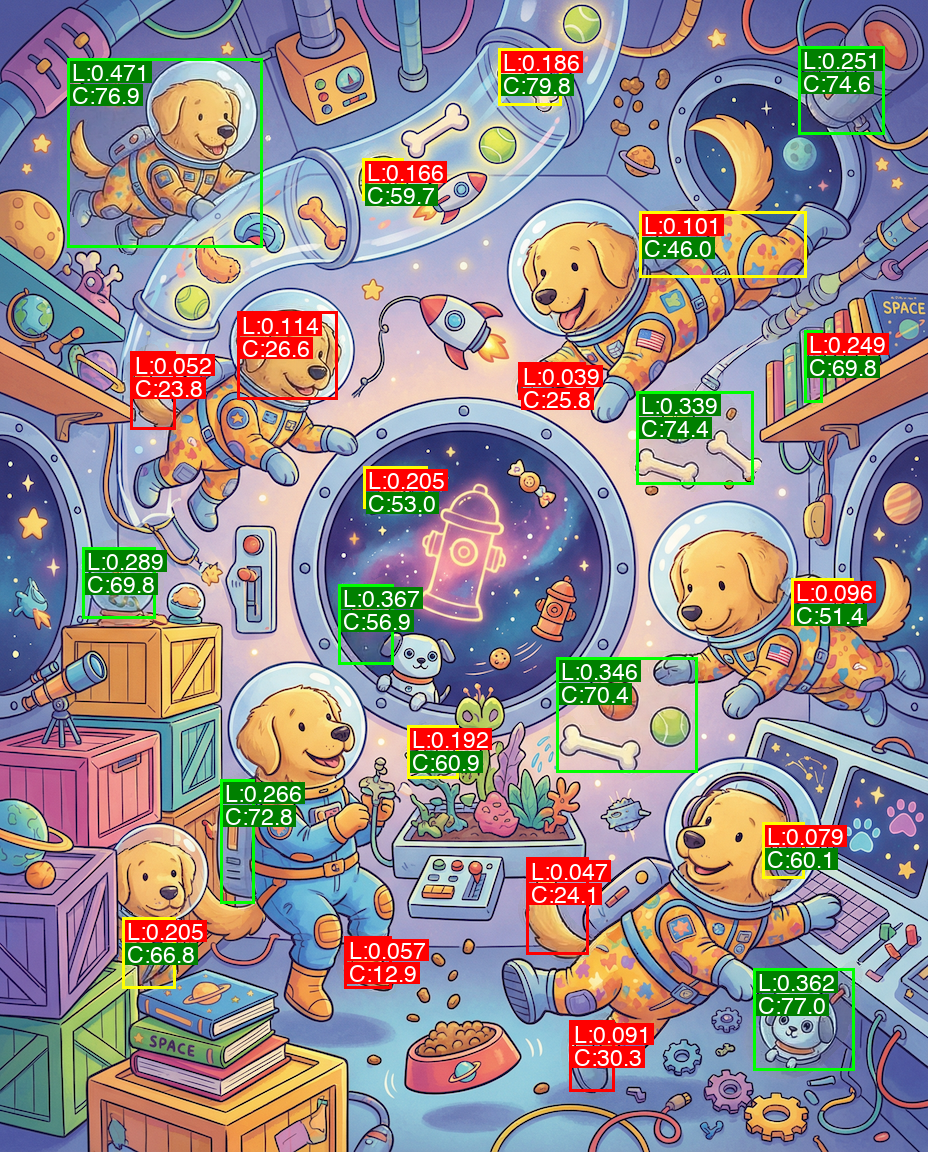
Determining if two images look different to the human eye is more subtle than just measuring pixel-wise differences. I ended up combining two scores generated with:
- lpips scores perceptual similarity between two images (it’s a model trained on humans’ ability to perceive image distortions)
- A Claude-coded color difference algorithm that scores spatial clusters of color differences between two images. The crucial bits here were spatial clustering (because inpainting can produce lots of pixel-level color changes spread out across a segment that don’t register to the human eye) and using LAB color space (because RGB distances don’t map well to human difference perception)
Segment 53: LPIPS distance = 0.133 (threshold: 0.25), Color diff = 59.8 (threshold: 36.0)
Segment 165: LPIPS distance = 0.076 (threshold: 0.25), Color diff = 33.3 (threshold: 36.0)
Segment 218: LPIPS distance = 0.471 (threshold: 0.25), Color diff = 84.1 (threshold: 36.0)
Segment 113: LPIPS distance = 0.224 (threshold: 0.25), Color diff = 61.3 (threshold: 36.0)
Segment 195: LPIPS distance = 0.252 (threshold: 0.25), Color diff = 54.1 (threshold: 36.0)
Segment 2: LPIPS distance = 0.410 (threshold: 0.25), Color diff = 72.5 (threshold: 36.0)
Segment 225: LPIPS distance = 0.052 (threshold: 0.25), Color diff = 29.7 (threshold: 36.0)
Segment 11: LPIPS distance = 0.089 (threshold: 0.25), Color diff = 31.9 (threshold: 36.0)
Segment 89: LPIPS distance = 0.384 (threshold: 0.25), Color diff = 68.0 (threshold: 36.0)
Segment 41: LPIPS distance = 0.244 (threshold: 0.25), Color diff = 58.8 (threshold: 36.0)
Segment 289: LPIPS distance = 0.097 (threshold: 0.25), Color diff = 42.4 (threshold: 36.0)
Segment 95: LPIPS distance = 0.133 (threshold: 0.25), Color diff = 68.6 (threshold: 36.0)
Segment 175: LPIPS distance = 0.189 (threshold: 0.25), Color diff = 72.9 (threshold: 36.0)
Segment 171: LPIPS distance = 0.326 (threshold: 0.25), Color diff = 72.9 (threshold: 36.0)
Segment 216: LPIPS distance = 0.326 (threshold: 0.25), Color diff = 68.8 (threshold: 36.0)
Segment 269: LPIPS distance = 0.377 (threshold: 0.25), Color diff = 64.6 (threshold: 36.0)
Segment 242: LPIPS distance = 0.107 (threshold: 0.25), Color diff = 27.5 (threshold: 36.0)
Segment 279: LPIPS distance = 0.047 (threshold: 0.25), Color diff = 13.2 (threshold: 36.0)
Segment 131: LPIPS distance = 0.362 (threshold: 0.25), Color diff = 77.2 (threshold: 36.0)
Segment 20: LPIPS distance = 0.100 (threshold: 0.25), Color diff = 33.5 (threshold: 36.0)
Segment 271: LPIPS distance = 0.390 (threshold: 0.25), Color diff = 69.8 (threshold: 36.0)
Segment 226: LPIPS distance = 0.299 (threshold: 0.25), Color diff = 56.3 (threshold: 36.0)
Segment 14: LPIPS distance = 0.053 (threshold: 0.25), Color diff = 24.6 (threshold: 36.0)
Approved 16 out of 23 segments
Chose 9 spatially distributed segments for final image
Thresholding both of these of these scores gave me a reliable way to know if an inpainted “change” actually looks “changed” to a human.
8. Choose final best N ‘changes’
From this list of “changes that are visible to the human eye”, we choose the N best by considering:
- Spatial distribution (don’t want changes all clumped together)
- Desired difficulty (size and subtlety of changes)
9. Composite the final result
Draw only the approved inpainted segments on top of the original (to guarantee no other changes leaked, in case you didn’t use a mask-respecting model for inpainting), and tada!
You’ve got a Spot the Difference pair of images with a reliably known number of differences that are clearly visible to the human eye.
10. Controlling difficulty
Per-user difficulty is tweaked by adjusting step 3’s “size of segment” filter (smaller masks = harder to spot) and the number of changes you ask users to find. We could also tweak the perceptual similarity thresholds, but I’ve found this to risk things becoming way too hard.
11. Weaknesses
First, I don’t feel I can 100% absolutely without-a-doubt always rely on the above two perception metrics to guarantee that two versions of a segmented mask are visually distinct to a human. And I really don’t want to sell an Elbo Book with an unsolvable puzzle that bums a kid out. So we currently use N+2 changes in the image even though the instructions say “Can you find N…“.
I know this isn’t ideal, but it lets me sleep easier in case one of the above perceptual difference scores lets something slip through that isn’t findable for a human. I don’t want somebody poring over an image for an hour, unable to find the impossible-to-see 5th difference.
(I was shocked by how hard Spot the Difference stuff could get in early testing. I shipped some tester books that were way too hard until I balanced the parameters in step 3 a bit more.)
Second, in my original list of risks, I mentioned “the model making changes that look weird.” This can still happen at times…but it’s getting better and better with each new image model release, and I’m confident it’ll soon go the way of the dodo.
Generating kids’ activities with AI
Using AI to generate mazes, Spot the Difference puzzles, and Zebra puzzles all had solutions with similar shapes: AI prompts for creativity/personalization + custom code for reliability/correctness. Maybe I’ll write about Zebra puzzles next.
I wonder how long it’ll be before these pathologically difficult cases are easily and reliably solved with pure prompting/agents.
PS You should go buy an Elbo Book or gift card for somebody. They’ll remember it as one of the most creative gifts ever.
* We haven’t cracked reliably generating “Hidden Pictures”-ish or “Where’s Waldo”-ish puzzles yet, but I can feel it getting close. This is one of the hard problems. You often want a very detailed picture with tons of small humans/creatures/details/etc to make it challenging, but the more you get that, the more you’ll have weird deformed humans/shapes. And the nature of the challenge involves readers closely examining every part of an image, so those deformed shapes are kinda gross. This feels solvable with clever fixes…but I’m also sure upcoming image models will solve it for us.